

How To Remove Exterior Door
How to Replace an Exterior Door
DIY techniques for a weathertight exterior door installation
![]() Fourth dimension
Fourth dimension
Multiple Days
![]() Complexity
Complexity
Intermediate
![]() Cost
Cost
Varies
Introduction
Replace a worn, drafty front door with a fashionable new free energy-efficient one. Replacement doors come up pre-hung in a weatherstripped frame and you lot don't have to exist a master carpenter to do a first-class job. We'll show you the techniques that will result in a perfect, weathertight installation.
Tools Required
Materials Required
- 10d finish nails
- 10d galvanized casing nails
- 16d galvanized casing nails
- three-in. deck screws
- 4d finish nails
- 6d finish nails
- Backer rod
- Minimal expanding foam
- Polyurethane caulk
- Roll of flexible self-sticking flashing membrane
- Transition molding Transition molding (optional; Photograph 13)
- Treated lumber to build up the sill (optional)
Prehung Exterior Door Installation

Rarely tin you complete a project in a weekend that will save y'all money and dramatically better the looks of your house like hanging a new front end door. In this article we'll testify you how to society a prehung exterior door that fits similar a glove. And so we'll show you, step by footstep, how to get your one-time door out and the new one in.
If you can handle basic carpentry tasks, you'll accept no trouble installing a new pre-hung entry door in a day. Figure on another day to finish the details and beginning painting the door. Front end door paint adds personality and curb appeal.
Video: How to Hang a Door
Project step-past-step (nineteen)
Step ane
Figure A: Measure out Your Old Door
In most cases, just order a new door the same size as the old one. If you alter the size or add sidelights, you'll accept to reframe the opening and alter many details. This usually doubles or triples the size of the job. Hither are the 4 sets of measurements you'll need to society a door (refer to Figure A for actress details):
Door size
- Mensurate the width and height of your old door.
- Round these up to full inches to detect the size of the replacement door you lot'll need.
- For example, if your door measures 35-3/4 in. wide and 79-1/2 in. tall, y'all'll order a 36-in. by 80-in. door.
Jamb width
- Measure out from the behind of the interior trim to the backside of the exterior trim (Effigy A).
- Specify this jamb width when you order your new prehung door.
- This guarantees that the interior trim will fit flush to the wall without calculation "jamb extensions."
Rough opening
- Yous'll demand to remove the interior trim for authentic measurements of the rough opening.
- Measure the opening width between framing members and from the lesser of the sill to the height of the opening.
- Compare these measurements to the rough opening requirements of your new door to brand certain it will fit.
Exterior opening (or "masonry opening" if you lot take a brick or rock door surround)
- Measure to the outsides of the exterior casing, and so from the bottom of the sill to the top of the trim.
- Compare these measurements with those of a prehung door that has standard two-inch-wide "brick molding" trim.
- If the framed door with standard trim is too small to fill up the space, or if you want a dissimilar trim style, you lot accept three options.
- The best solution is a door with wider, flat casing to fit the opening. You can ever add a piece of decorative molding overtop to approximate the style of your existing exterior trim. (We ordered 2-1/four-in. flat casing and reinstalled the existing decorative molding.)
- Second, y'all tin can order your door with standard molding and fill the gap with additional strips of wood.
- The last option is to gild the door without outside molding and make your own to fit.

Step two
Remove Your Old Door
- Tap the swivel pins loose with a hammer and blast set.
- And then swing the door open and elevator it off.
- Protect the floor with a dropcloth. The old door will exist heavy.

![]()
Step three
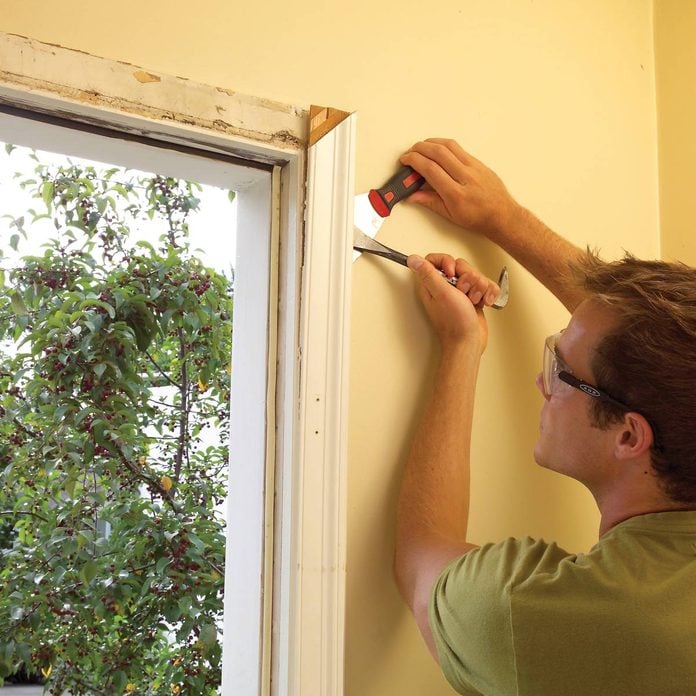
Pry Loose The Old Trim
- Pry the interior trim loose from the door frame.
- Protect the wall with a wide putty knife.
- If you plan to reuse the trim, starting time score the intersection betwixt the molding and jamb with a utility knife.
Stride iv
Pry Off the Exterior Trim
- Piece the caulk joint betwixt the siding (brick) and outside trim.
- Pry the trim from the doorjamb with a pry bar.
Step 5
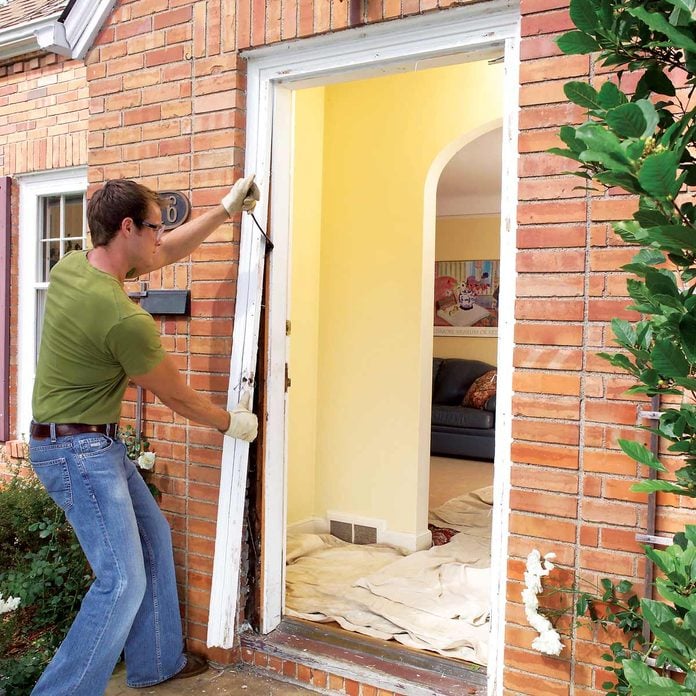
Remove the Jambs
- Cut completely through the side jamb with a handsaw.
- Pry the jambs loose and pull them out of the opening.

Step half-dozen
Jamb Removal Shut-Upward
- If y'all programme to reuse the interior moldings, pull the nails through the backside with a pliers or nipper to avoid damaging the face up.
- Cutting through i side jamb makes information technology like shooting fish in a barrel to tear out the entire frame.

Pace 7
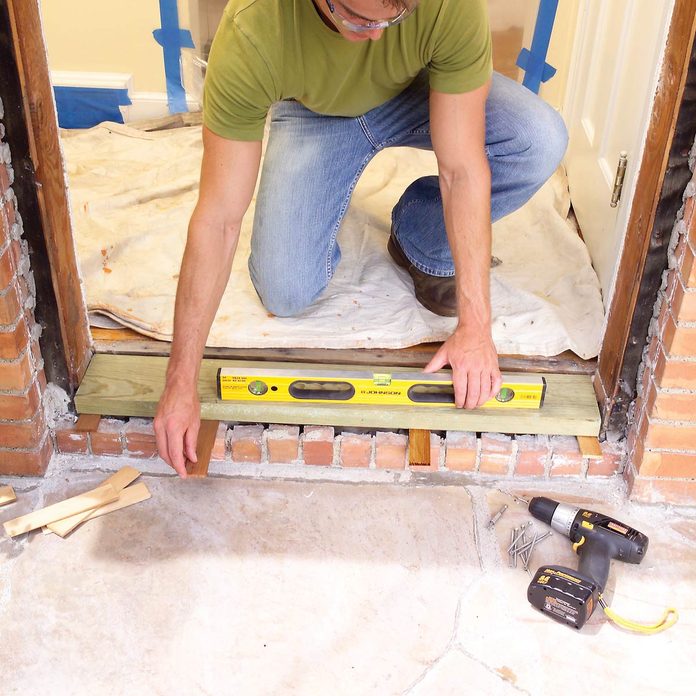
Gear up and Install the Sill
- Later on the door frame is out, check the condition of the framing and subflooring in the sill area.
- Cut out and supercede any rotted wood.
- If the sill on your new door is thinner than the i you removed, y'all may have to build up the sill area. We were lucky. Our brick opening was level and plumb, merely this isn't always the case.
- Start by checking the sill surface area with a two-foot level. If you're building it up as we evidence in the photo below, information technology's easy to level it with shims at the same time.
- Set the sill height so the door just clears rug or rugs when it swings in.
- Build up the sill area to the proper height with treated lumber. Add shims to level it.
- Level the sill area with pairs of shims spaced about four inches apart.
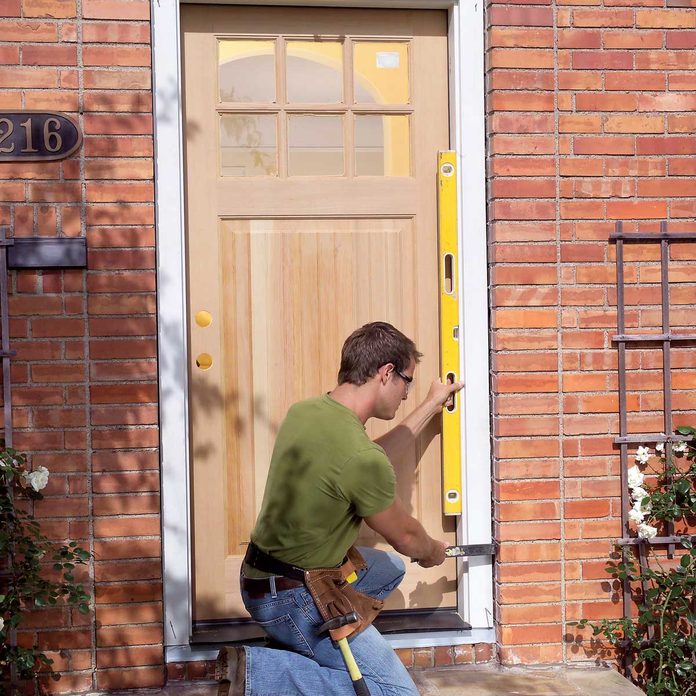
- Then set the door in the opening for a test fit. Hold a level confronting the hinge jamb and accommodate the door and frame until the jamb is plumb.
- Check to see how the casing fits confronting the siding. If the siding is so far out of plumb that the door frame and casing don't fit in, either cut dorsum the siding or trim the casing. It looks better if y'all can cutting the siding, but it'due south usually more practical and easier to trim the casing.
- Mark the casing in areas that demand trimming.
- Then take the door out and trim the casing with a belt sander or circular saw.
- Once level, fasten it with coated deck screws.
Step eight
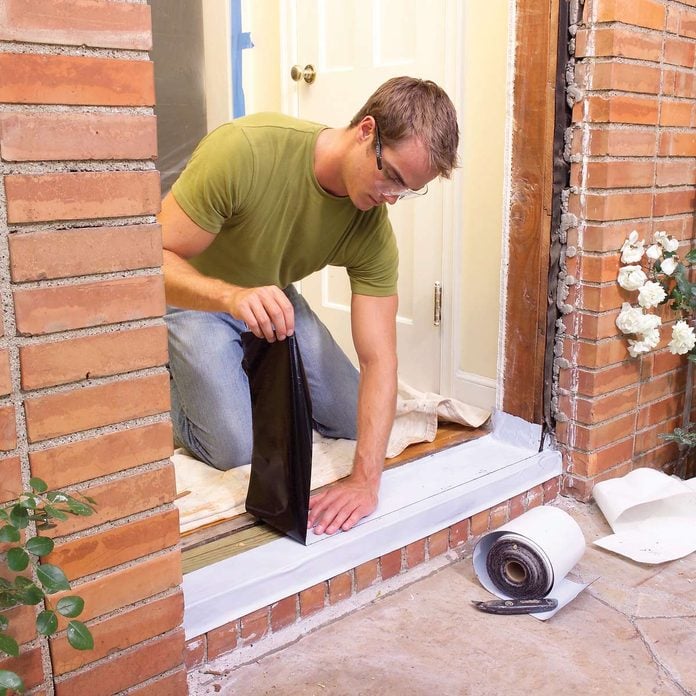
Install Flashing Tape
- Installing flashing record will protect the sill from h2o intrusion. Purchase the flashing tape from lumberyards.
- If you're installing a door in a newly constructed wall, you can buy a special plastic sill flashing kit instead. One make is Jamsil. Details volition vary depending on the doorway situation.
- Comprehend the rough sill area with cocky-sticking flashing record.
- Wrap it up the sides of the opening and over the forepart edge.
- Set up the door in the opening, plumb it and bank check the fit.
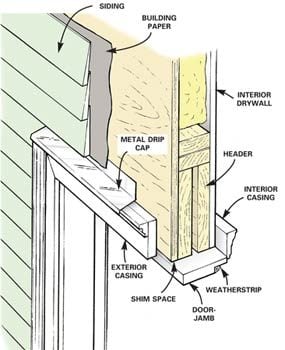
Step nine
Figure B: Sill Detail
- The idea is to channel water away from the wood. If your home is built on a physical slab, the door frame volition probably residuum direct on the slab.
- Figure B illustrates how to correctly install your sill to reduce any future potential of h2o harm.

Footstep 10
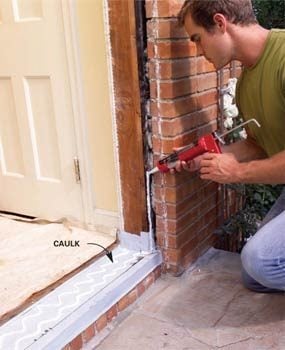
Apply Caulk
- Make sure the building paper is intact around the frame edges. If not, slide strips of No. 15 felt behind the siding and tack information technology to the framing with staples.
- When you lot're sure the door volition fit, caulk along the sill and behind the casing and tip the door into the opening.
- Use a bead of polyurethane caulk along the sides and top of the door opening and at the sill according to the manufacturer's instructions.
- You'll probable need 2 tubes.
Footstep xi
Tack in the Prehung Outside Door
- Make sure the doorsill is level.
- Then centre the top of the door in the opening and tack it into identify with galvanized casing nails.
- Plumb the swivel-side jamb and tack the bottom corners.
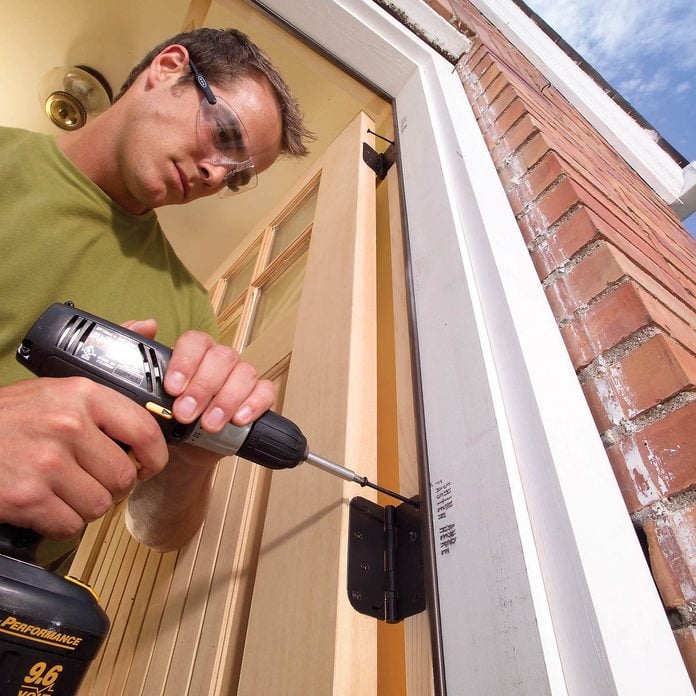
Step 12
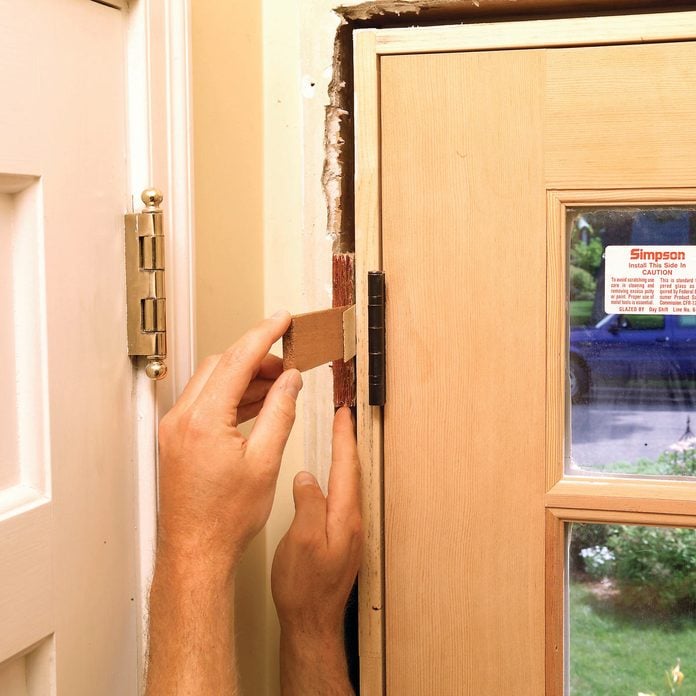
Shim the Swivel-Side Jamb
- Shim behind each hinge.
- For large spaces, start with small squares of plywood.
- Then cease with pairs of shims.
- Make sure the hinge-side jamb remains plumb.
Footstep 13
Shim the Latch-Side Jamb
- The goal is to center the door in the opening and shim the sides until they're plumb and straight.
- Shim at the top, middle and bottom of the latch-side jamb and at the top until the gap between the door and the doorjamb is consistent.
- Score the shims with a utility knife and break them off.
- When yous're happy with the fit, nail through the jamb into the framing at each shim location.
Step 14
Supplant the Swivel Screws
- Replace a screw in each hinge with a three-inch screw driven into the framing.
- Drive boosted casing nails every xvi in. forth the sides and top of the exterior trim.
Step 15
Effigy C: Drip Cap
- If your door is exposed to the weather condition, straight water away from the door with a metal drip cap overtop as shown in Effigy C. Y'all'll find drip caps at home centers and lumber yards.
- Brick openings like ours and doors protected by porches with roofs don't require a drip cap.
- If the drip cap is damaged or missing, install a new one before yous set the door frame in the opening.
- Cutting the metal drip cap to fit and slide it under the siding and edifice newspaper (Figure C).
- If nails are in the way, slip a hacksaw blade under the siding and cut them.
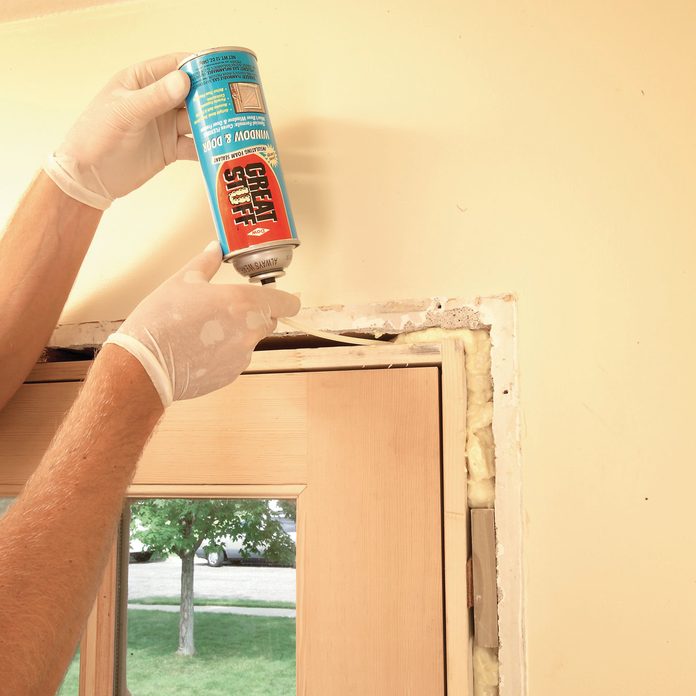
Step 16
Insulate Around the Door
- Fill the infinite between the doorjamb and the framing with minimal expanding cream insulation (y'all'll need well-nigh ii cans).
- Later on the foam has expanded and skinned over, loosely stuff whatever remaining infinite with strips of fiberglass insulation.
Step 17
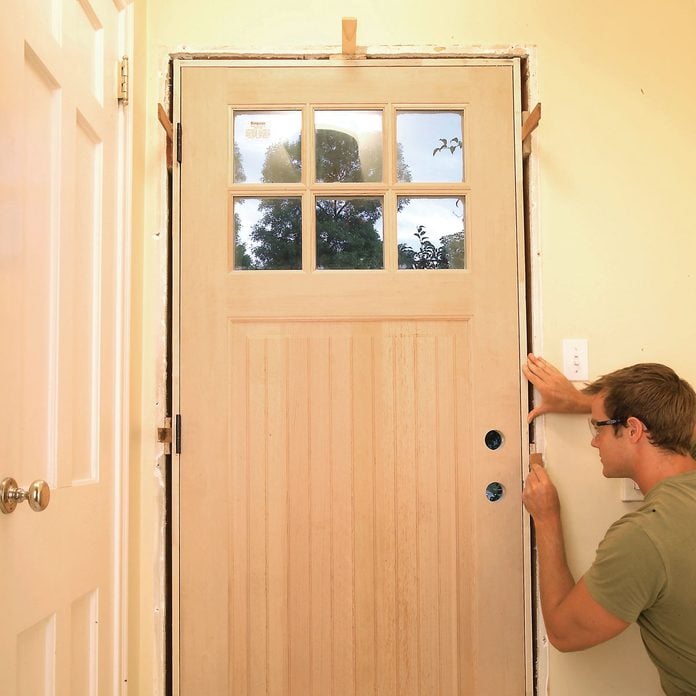
Install Interior Trim
- Cut and install new interior trim or reinstall the old trim.
- If in that location's a gap between the new sill and the existing floor, comprehend it with a beveled transition.

Step 18
Use Caulk Capitalist and Caulk
- Press foam backer rod into the siding/trim gap.
- Apply a neat bead of caulk between the siding and the door trim.
- Cut a trim lath to fit nether the sill and screw information technology to the framing.
- For gaps wider than iii/16 in., insert a foam backer and use caulk over information technology.
- Nearly doors crave an boosted trim board under the sill to support its outer border.
- Finally, remove the door and paint or stain and varnish the door, jamb and trim.

Step 19
Editor'due south Notation: Ownership a New Prehung Outside Door
Most domicile centers stock prehung exterior doors in a limited number of styles.
- Mutual jamb widths for stock doors are iv-9/16 in. and half dozen-9/16 in., and they usually include two-inch broad brick molding for exterior trim. These doors work bang-up for newly constructed walls and for replacing doors in newer homes.
- But if, after measuring the jamb width and opening sizes for your existing door, you lot discover that you need a unlike size jamb or that your exterior trim is wider, then you'll save a lot of headaches by ordering a door to your exact specifications.
There are iii types of doors to choose from.
- Steel doors are pop because they're inexpensive and require little maintenance.
- Fiberglass doors won't warp or rot, and the more than expensive models are hard to tell autonomously from real wood.
- You'll find the widest selection of styles in wood doors, but be prepared to spend extra time maintaining the finish.
Prehung exterior doors are available at dwelling centers and lumberyards. If you tin't observe what you're looking for in stock, you can order it.
- Take along your measurements and a sketch showing which way the door swings.
- If y'all plan to install a new entry knob and deadbolt, pick them out before you lot order the door.
- Then ask the salesperson to have the door drilled to accept your hardware. It'll cost a little extra, but it'southward well worth it to avoid the nerve-racking job of drilling into a new door.
- Don't forget to lodge hinges that will match the stop of your hardware.
Get some ideas for a new door after looking at this stunning door options.

Originally Published: May twenty, 2022

How To Remove Exterior Door,
Source: https://www.familyhandyman.com/project/how-to-replace-an-exterior-door/
Posted by: finneymyseat.blogspot.com
0 Response to "How To Remove Exterior Door"
Post a Comment